THE ART OF THE PART

The

ART OF THE PART

is one of my favorite topics! I love to see the change when a simple shift happens, especially for women who have been parting their hair in the same place for years!

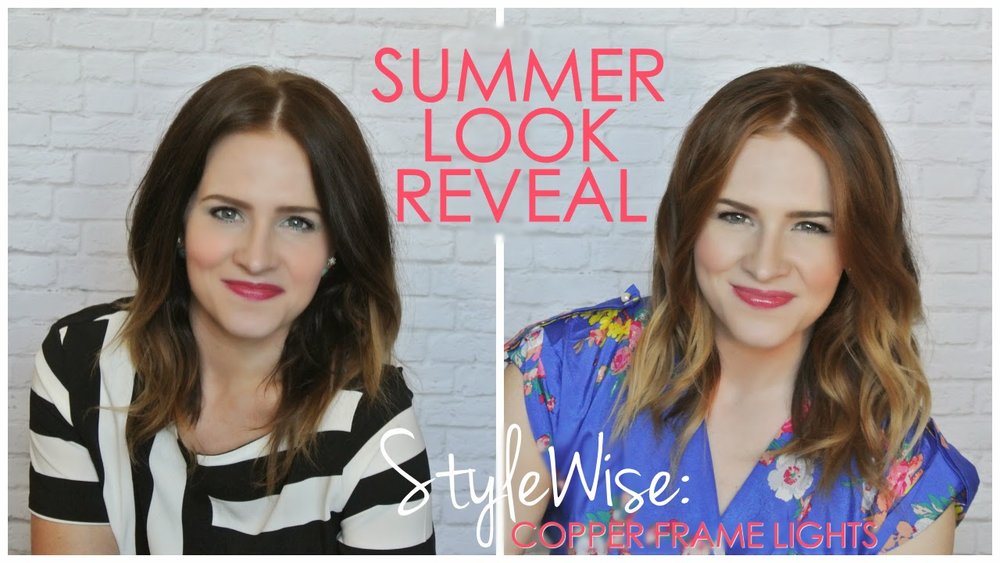
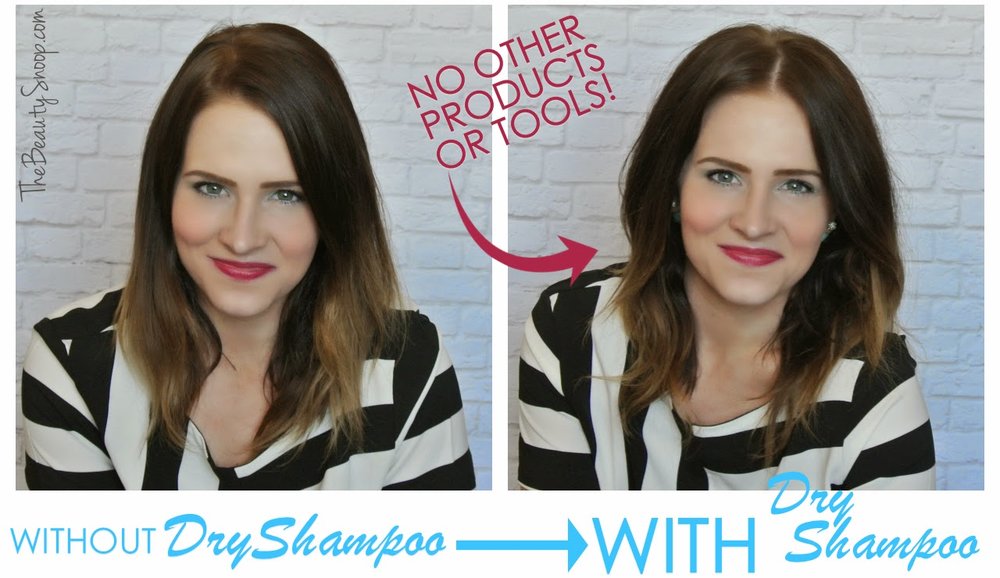
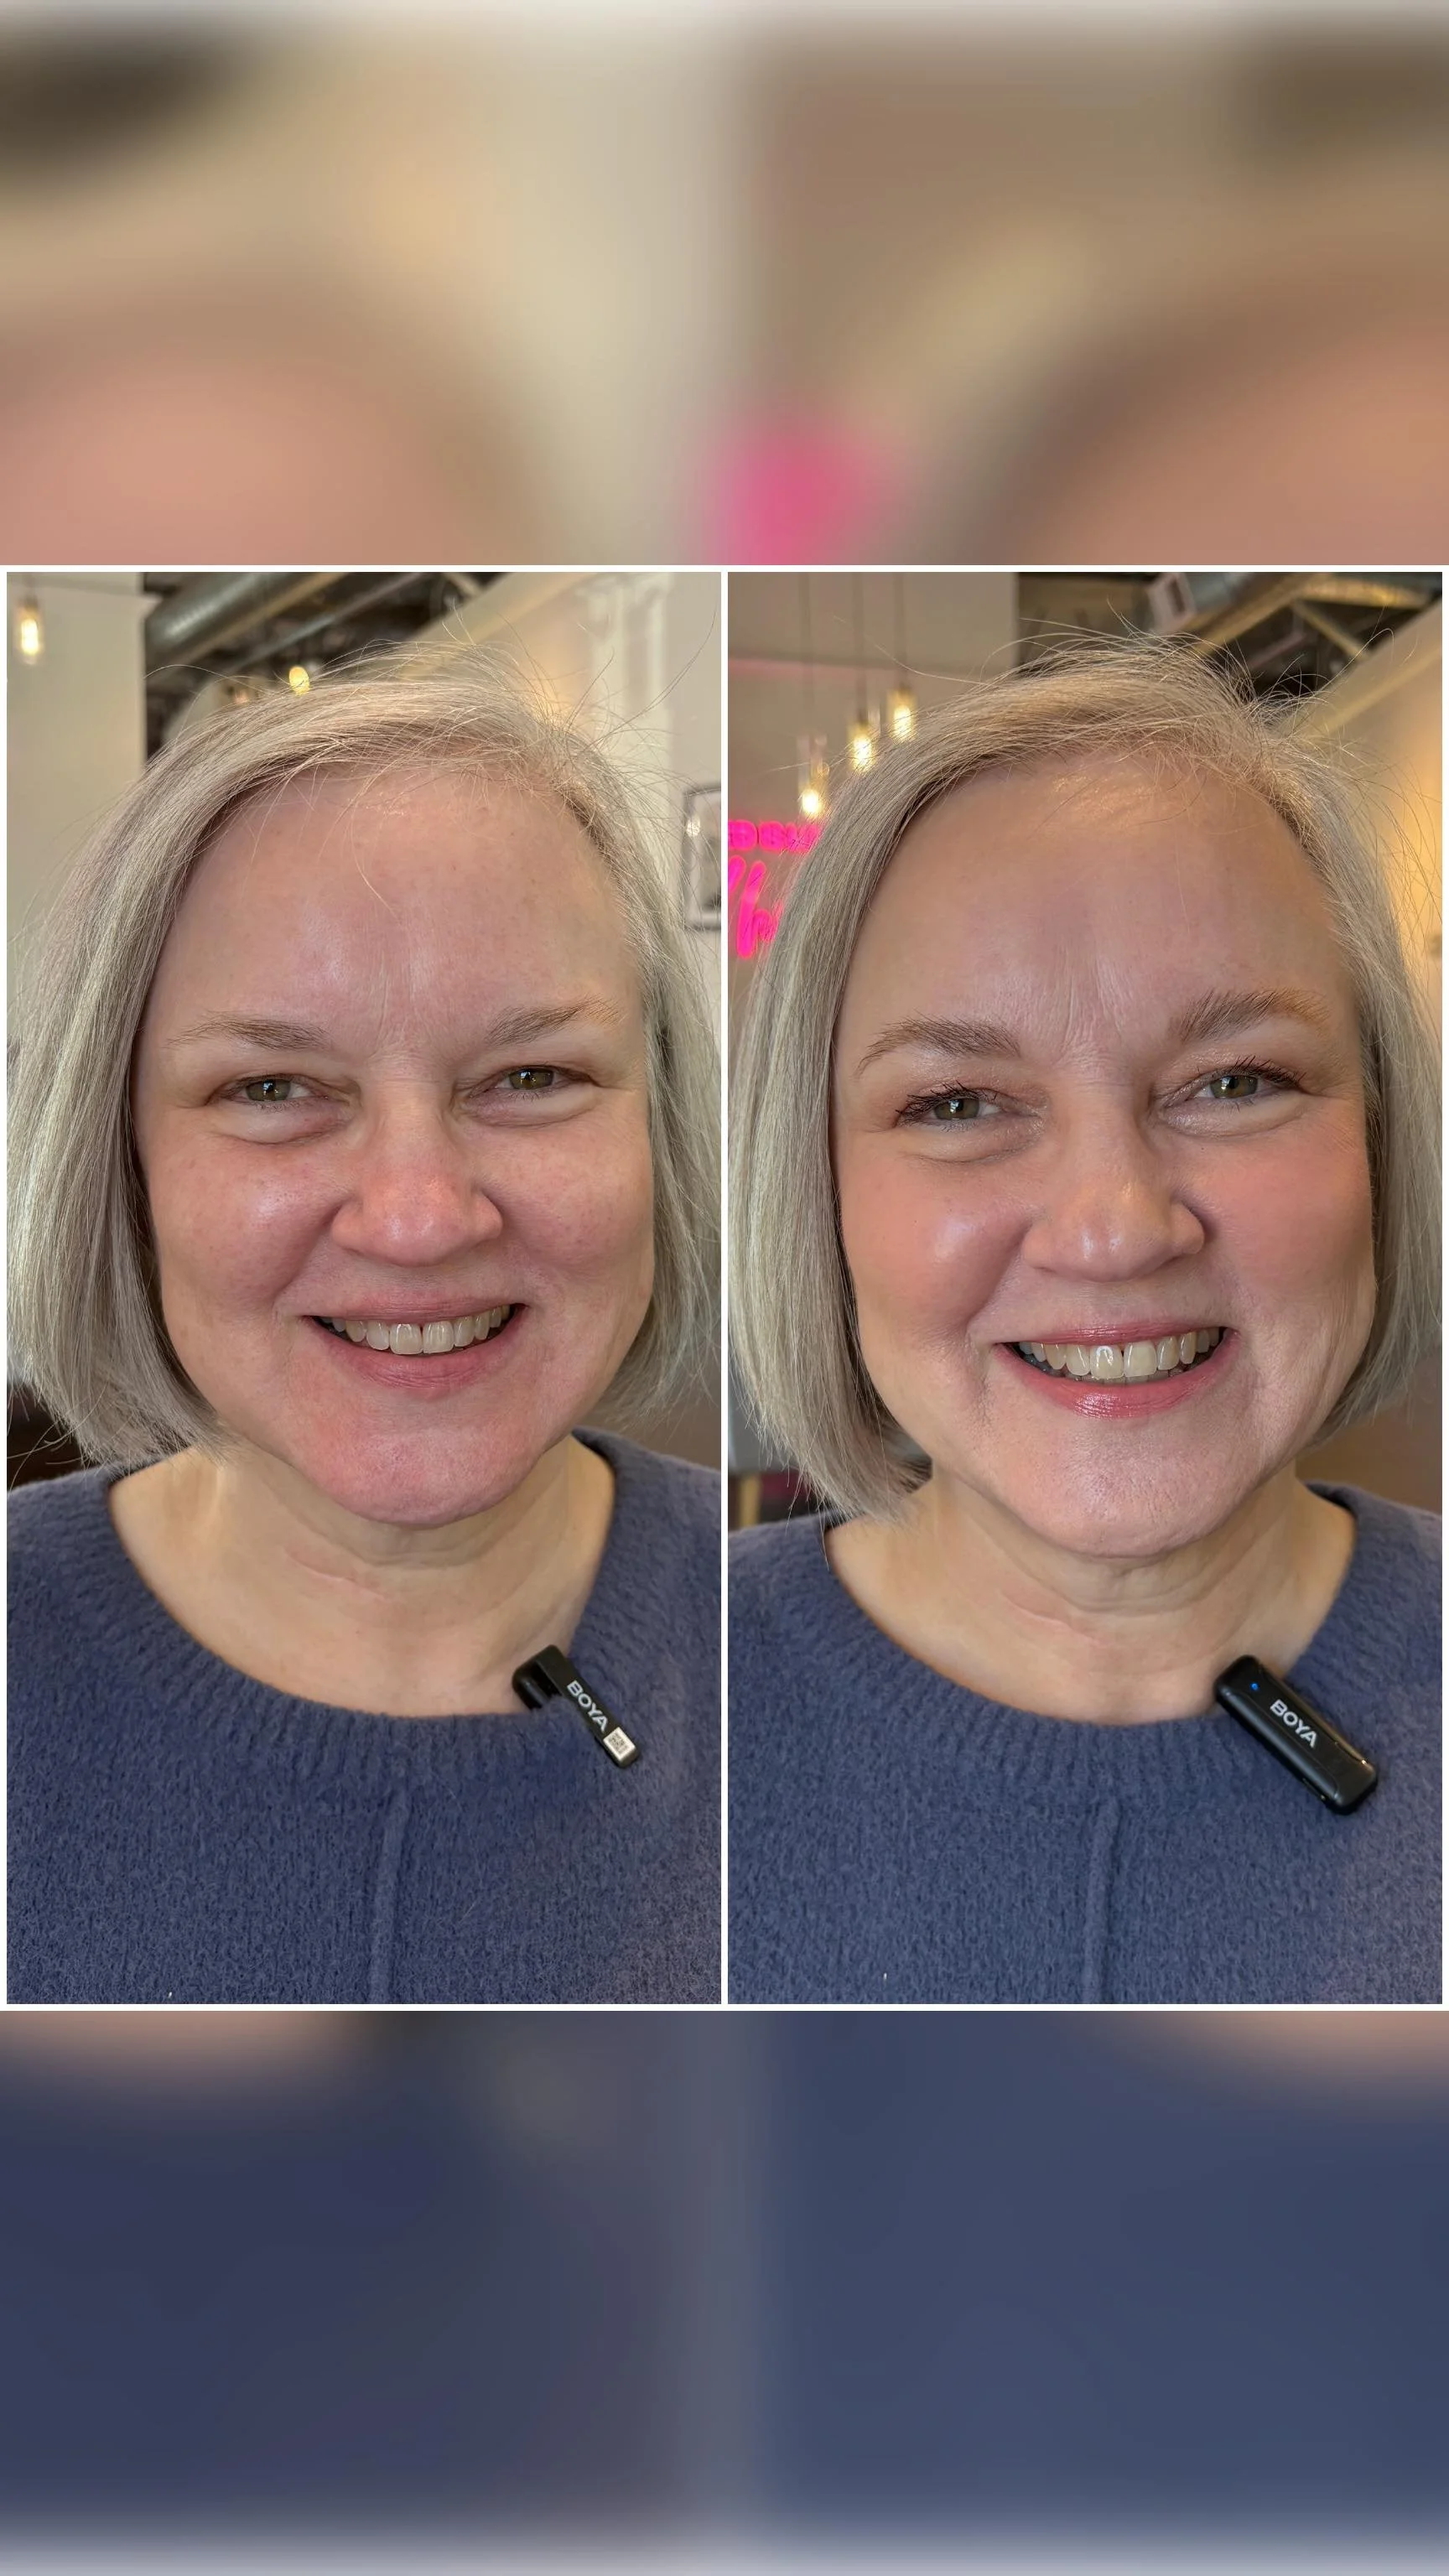
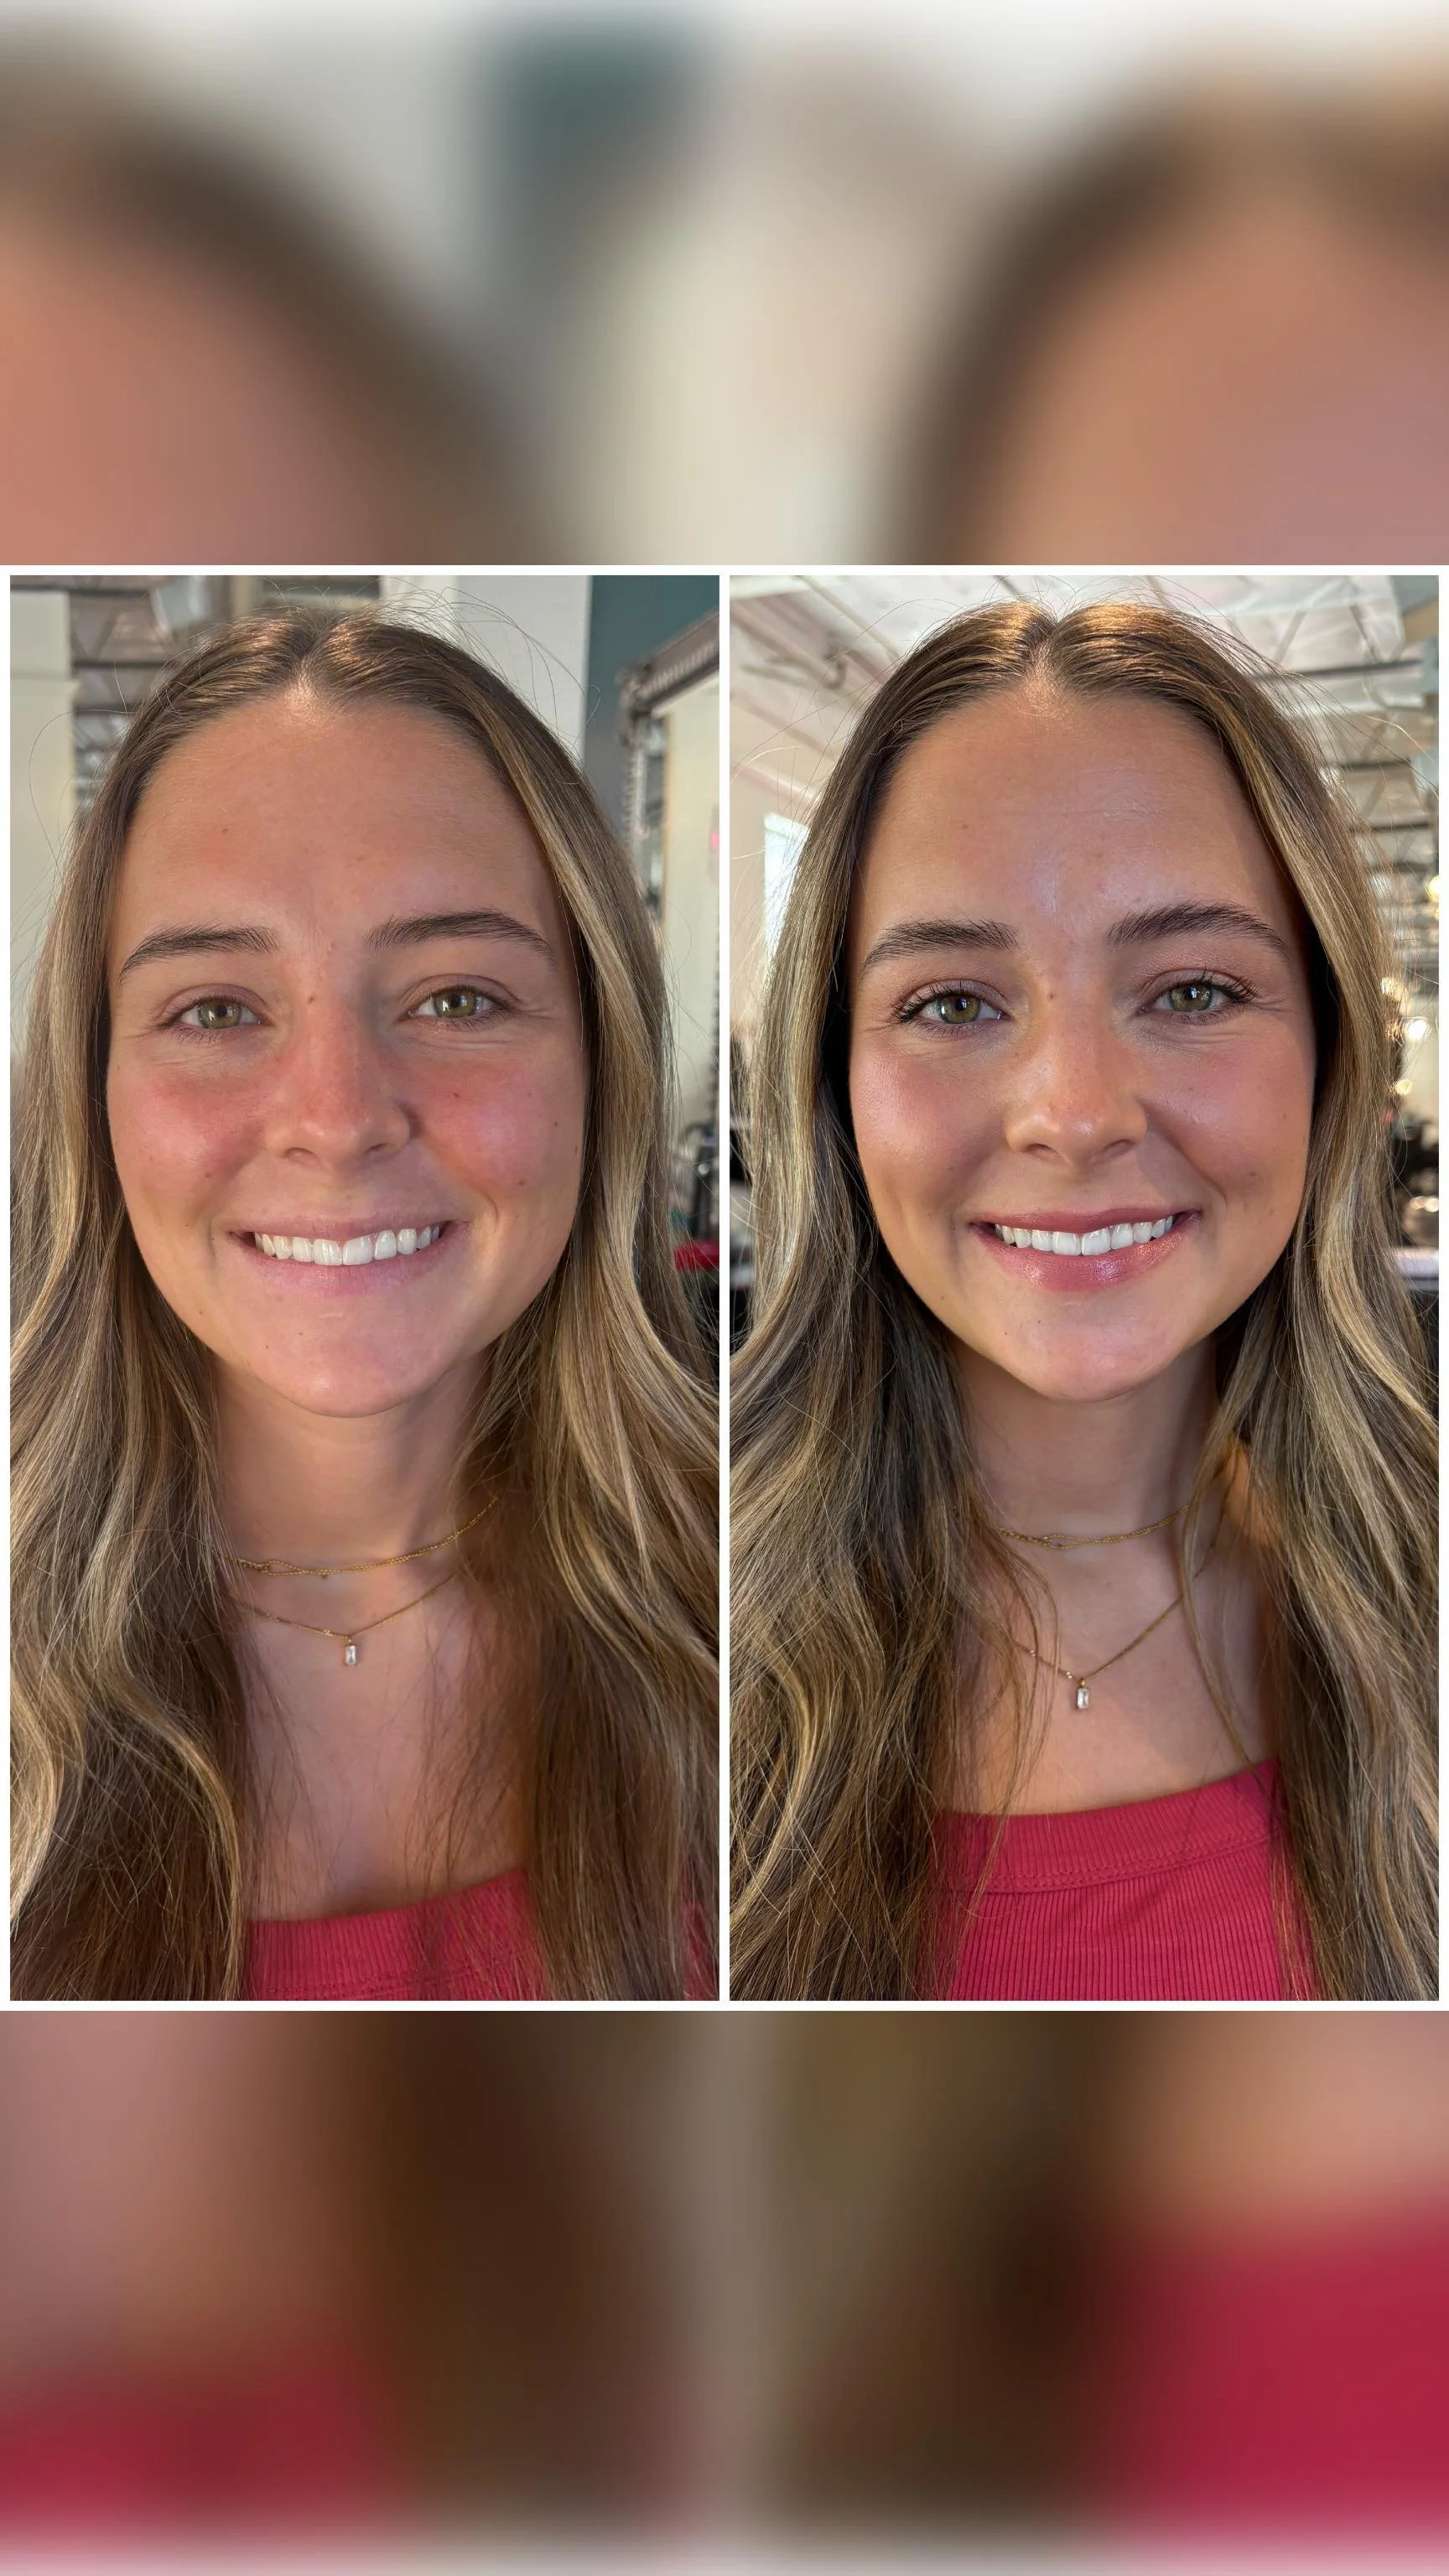
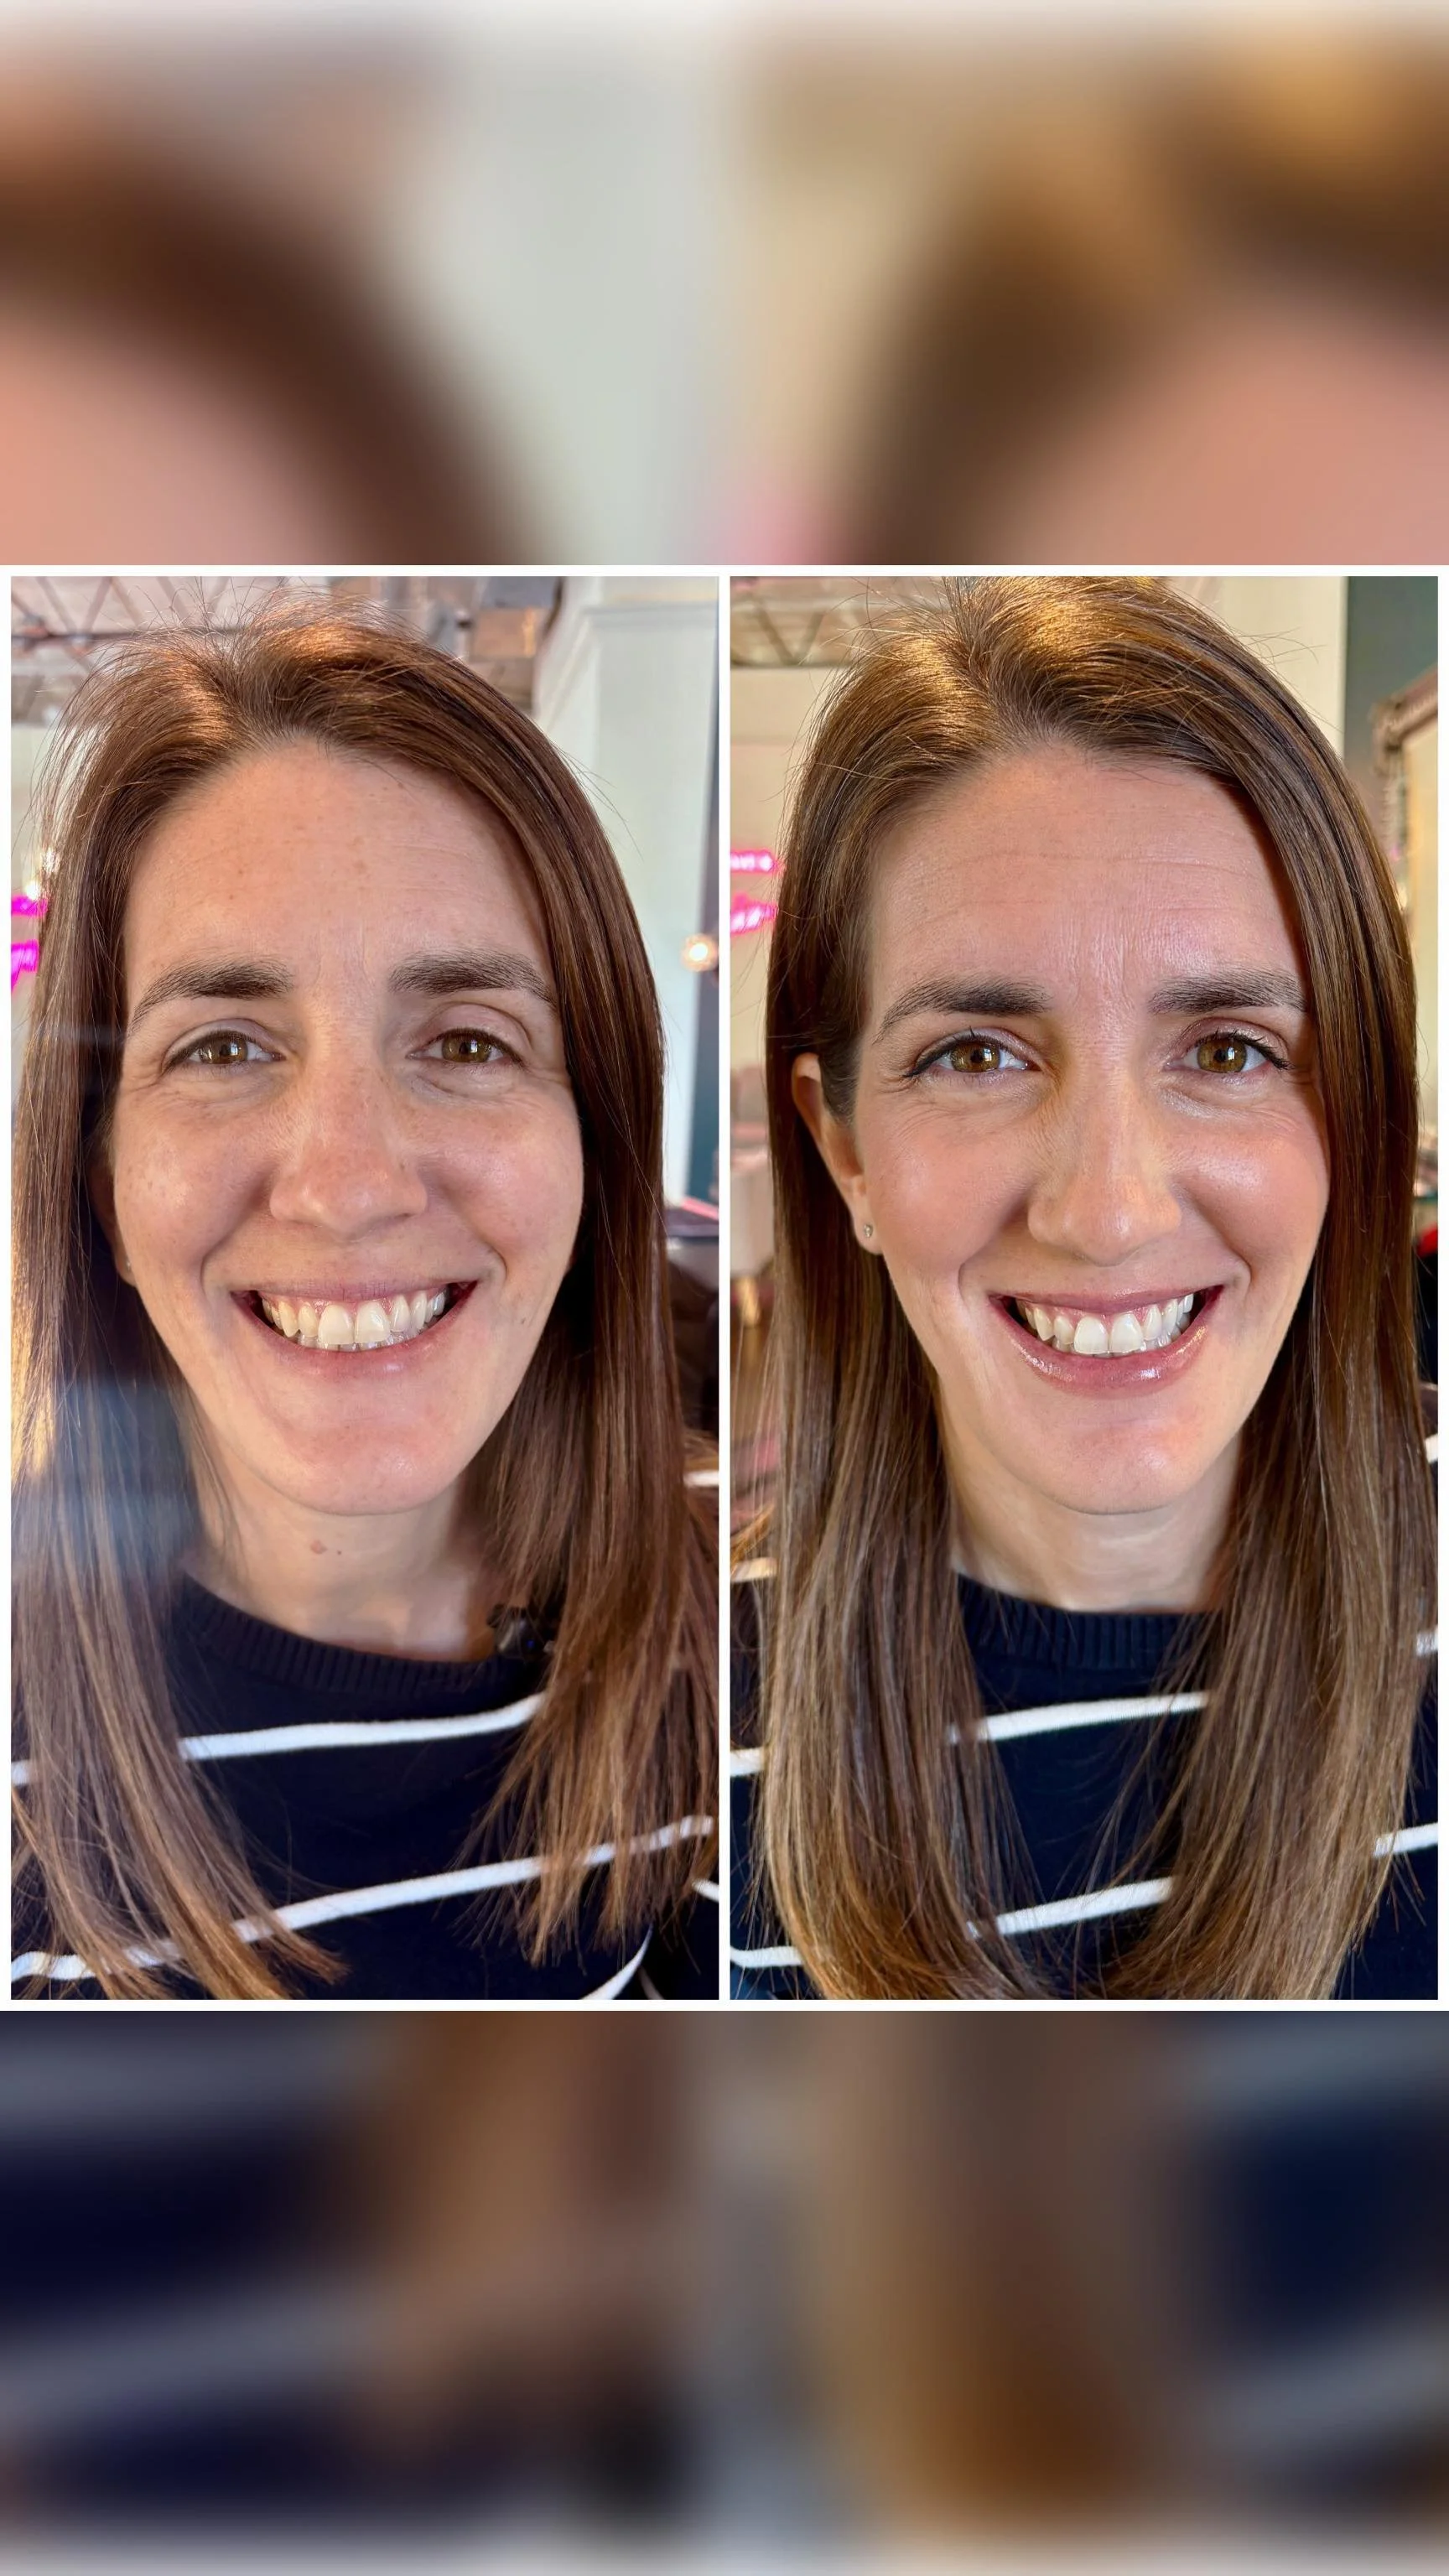
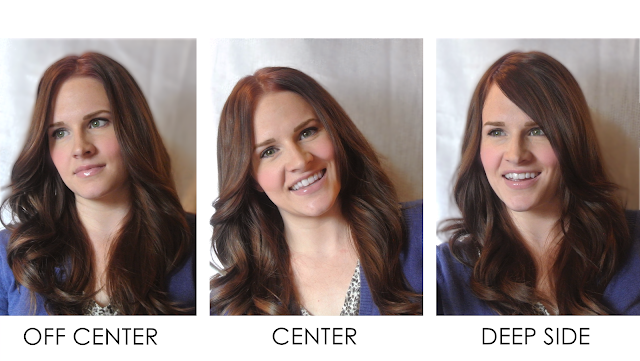
You might not think that it could make a huge difference, but you'd be surprised with the amount of change it can have. Just look at my three pics above- same makeup, same clothing... but different partings make a HUGE difference in the appearance in my face and the area in which your eye is drawn to.

Here is a quick guide [

video

] that gives you some inspiration and a starting point to finding the most flattering part line. 
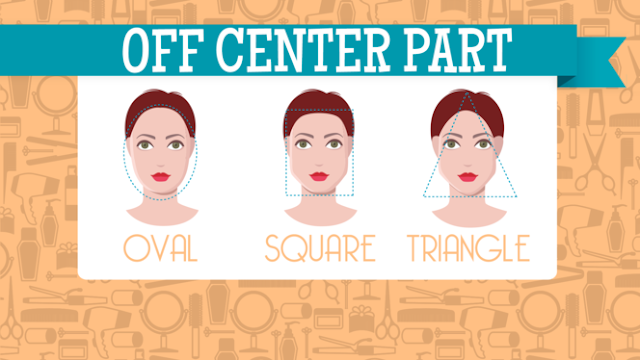
Off-Center Part:

Off center partings are great for most face shapes and hairlines- especially oval, square, or triangle

. It will drape a small bit over the forehead, hiding some of it, and directly focus to the eye that is more revealed. 

Place the parting over the center of one eye, and angle back towards the center of the crown. If you already wear this parting, a simple flip to the opposite side is a great way to add variety
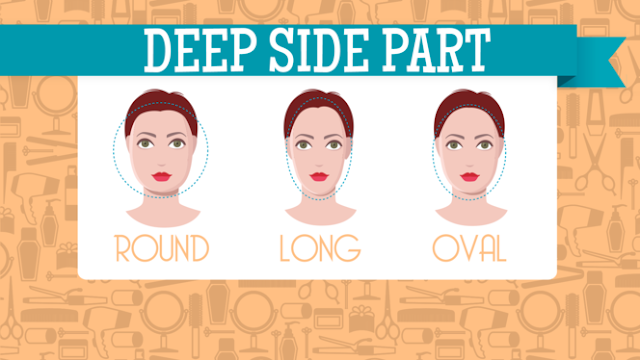
Deep Side Parting:

Deep side partings are best for Round, Long and Oval faces- as well as more angular faces like Heart Shaped and Diamond.

This parting will cover a majority of the forehead, and direct the eye to the cheekbone. It will soften harsh bone structures and give a more 'formal' feeling to the hairstyle.

Part the hair over the tail of one eyebrow, and slide straight back for a more aggressive parting, or angled towards the center of the crown for a less formal style. 
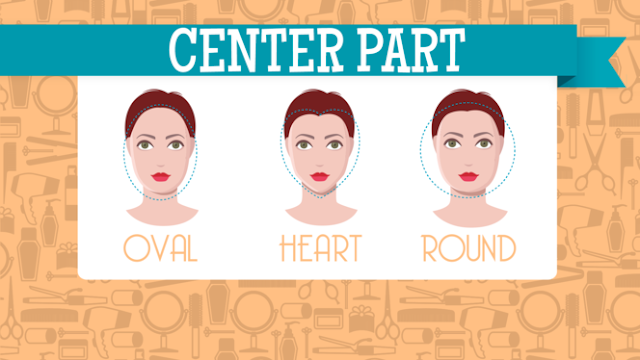
Center Parting

:

Center parts are great for Oval, Heart Shaped, and Round face shapes

- this parting draws attention to the forehead and eyes, and is slightly more 'edgy' than the rest. A nod to the hippie/boho vibe, this parting works best with longer hair lengths, and those that don't have cowlicks near the hairline.

Avoid center parts if you have a large forehead (more than 4 finger widths, generally) or a larger nose- as this parting will draw attention to the center of your face and cheekbones. I always wear this parting with slightly more makeup, because it is going to really show off the face (no hiding behind your hair with this one!)

Part right down the middle directly above your nose, but only go back 2-3 inches to avoid looking 'flat-headed', and tease the crown slightly for added volume.

Hope this helps inspire you to try a new parting! You never know till you try! xo

Follow on Bloglovin

REAL WOMEN MINI MAKEOVERS

The best part of my job is helping women to look and feel their best. I get to see transformations happen every day at the salon- and I often feel so blessed to be a part of changing the confidence of women for the better. We all deserve to feel great!

This week on my Studio5 TV segment I had the opportunity to pick 4 real life viewers of the show, to come in studio and get a mini-makeover with yours truly. We had hundreds of entrants, and narrowing it down was no easy task. The four women I chose all had different needs and starting points with their makeup routines, it was so much fun to give them all a few new tools and tips to try at home.

Take a look at their results in the

video

below

Products Used:

Hope you'll try some of these simple updates, and let me know how it goes! xo

Follow on Bloglovin

!function(d,s,id){var e, p = /^http:/.test(d.location) ? 'http' : 'https';if(!d.getElementById(id)) {e = d.createElement(s);e.id = id;e.src = p + '://' + 'widgets.rewardstyle.com' + '/js/shopthepost.js';d.body.appendChild(e);}if(typeof window.__stp === 'object') if(d.readyState === 'complete') {window.__stp.init();}}(document, 'script', 'shopthepost-script');

JavaScript is currently disabled in this browser. Reactivate it to view this content.

BEST BLOW DRYERS FOR EVERY BUDGET

Using a nice blow dryer is comparable to driving the ultimate luxury car. And if you've been driving a rusty old hatch-back Honda around, you know exactly what I mean!

So what exactly is a good blow dryer?

Here is my criteria:

  • Powerful Motor

  • Light Weight yet Sturdy

  • Quiet

  • Dries the hair in under 10 minutes (15 for super long or thick hair)

  • Uses Ionic or Tourmaline Technology

  • Lasts a Minimum of 5 Years

If your dryer doesn't meet ALL of the criteria- you could be driving a rust bucket. And there are better alternatives out there for you. I've rounded up my top picks at every budget, so ladies (and gents) meet your new Cadillacs: [

video

]

  • Splurge- Harry Josh Pro Dryer $300 This is the dryer I use every day at the salon. It's Italian motor has a 15 year life span and it's powerful while being super compact. It has a 9 foot long cord which is awesome, and settings to turn on and off the ION function. You want 'On' for smoothness, and 'Off' for more volume. Totally worth the investment, in my opinion.

  • High End- Solano SuperLite $159 Lightweight with multiple heat settings- this guy is great if you suffer from static hair. It uses ceramic and tourmaline technology to add shine and heat hair from over drying causing unwanted static.

  • Mid Range- Ultra CHI $79 Besides being super cute to look at, this dryer is a tried and true that has been around (and loved) forever. CHI pioneered the use of ceramic technology for better heat distribution without unexpected bursts of cool air. This one has a single setting on heat however, so it's best for those with thick and long hair that tolerates high heat well.

  • Budget Friendly- Conair Infiniti Pro $29 This dryer packs a punch with over 1800 watts of power- but at a super affordable price. I LOVE the nozzle on this one because it's super wide and expands the width of your brush all at once. It also has a cool shot button which is great for a shiny finish on your hair.

  • Best Travel- BaByliss Pro Nano $39 Mighty and mini... two things that describe me- and THIS dryer! :) It's perfect for travel and comes with all the bells and whistles of your full size dryer, including a nozzle and long cord.

Thanks for reading- happy drying! xo

Follow on Bloglovin

!function(doc,s,id){ var e, p, cb; if(!doc.getElementById(id)) { e = doc.createElement(s); e.id = id; cb = new Date().getTime().toString(); p = '//shopsensewidget.shopstyle.com/widget-script.js?cb=1463178171148?cb=' + cb; e.src = p; doc.body.appendChild(e); } if(typeof window.ss_shopsense === 'object'){ if(doc.readyState === 'complete'){ window.ss_shopsense.init(); } } }(document, 'script', 'shopsensewidget-script');

10 DAY HAIR REPAIR RECIPE

Spring time is the perfect season to click 'reset' on your hair and get a fresh start. The winter months often leave us with dry parched hair, and a need for a boost of moisture. I always reccomend a nice trim at the salon in Spring, but adding my 10 Day Hair Repair Recipe for even better results. 10 Days to Better Hair:

Day 1- Begin taking a Hair Supplement daily to repair from the inside out. 

Day 2- Shampoo with a protein based ShampooConditioner. Cool rinse after washing.

Day 3- Rest day... no washing or heat tools, instead use Dry Shampoo and refresh the ends with an Argan Oil

Day 4- Protein Treatment on the midshaft and ends of hair to strengthen and washing. 

Day 5- Rest day

Day 6- Scalp Treatment using a Scalp Brush and Scalp Elixir

Day 7- Rest Day

Day 8- Shampoo & Deep Conditioning Treatment

Day 9- Rest Day

Day 10- Scalp Treatment 

You'll see great improvement in just 10 days, but continue to repeat the regimen to see even better results in 30 days.

This regimen has been carefully crafted to give you just the right amount of protein and conditioning during each 10 day cycle.

Get more details in the video below:

Here is to healthy hair!

Follow on Bloglovin

JavaScript is currently disabled in this browser. Reactivate it to view this content.

GROW YOUR HAIR LONG IN HALF THE TIME

This blog started after years of working in the salon industry and hearing many of the same complaints or questions over and over again. Those common threads drove me to create a place where I can answer the 'cries of help' for a larger audience and share my knowledge with all of you!

One such complaint I still hear in the salon ALL THE TIME is; ‘My hair never grows!'

Well ladies there are several reasons why you feel like your hair won't grow, but there are also several ways to aide in the process and speed things along. So lets look at both sides of the story.

Your hair won't grow because:

1- Breakage at the ends

2- Lack of scalp stimulation and blood flow

3- Poor nutrition and vitamin intake

Three Ways to induce hair growth:

1- Limiting your heat tool usage is going to be number one for keep length on the ends and avoiding breakage. Opt for a maximum of 2 times per week using either a blow dryer or flat iron/curling iron. Which means you'll need to use your dry shampoo on non wash days, or opt to let hair air dry if you are washing more often. And on that note, be sure you are shampooing correctly (here is my guide on that) and protecting the ends with a heat barrier. I recommend Alterna Heat Protection Spray

2- Amp up the blood flow to your scalp to increase cell activity and turnover with scalp stimulation. This can and should be done two ways: with cold water rinses after shampooing, and with scalp massage/dry brushing. The first way is pretty self explanatory, but cold water will quickly bring blood to the surface of the scalp, as well is make hair appear shinier and less frizzy.

Next, you'll want to buy a scalp-friendly paddle brush and thoroughly massage the scalp with long brush strokes nightly on dry hair. (Once your hair has reached the desired length, you can maintain with massage sessions weekly) Avoid brushing through the lengths and ends of the hair, as this could cause breakage- ONLY focus on the scalp. And of course be carful not to scratch or injure the scalp. I recommend The Wet Brush or the Tangle Teezer. Also, be aware of how you sleep. Consistent pressure on the scalp will limit blood flow, so if you ALWAYS sleep in the same position, your hair on that side of your head will grow slower. Rotating throughout the night is ideal for hair growth reasons.

3- Add a hair growth vitamin into your daily nutrition. Good hair comes from within, so eating healthy and exercising are always great places to start. But taking a supplement designed to help hair grow will be a huge step in achieving your goal. These vitamins are packed with Folic Acid, Vitamin E, Biotin, and Coconut Oil to aid in the strength and luster of the hair. My favorite are SugarBearHair Vitamins.

Remember that hair grows on average 1/2 inch per month, but with these techniques you can see that double! Good luck, and let me know if you have any techniques in the comments below, xo

INSIDER STYLIST TIPS: THE PERFECT AT-HOME BLOWDRY

Best at-home blowout, blowdry tips and tricks

Today I am excited to share some of my favorite

insider stylists secrets

for that perfect blowdry at home. I get asked about this a lot at the salon, and truly everyone loves a wonderful blowout that lasts a few days. Watch the

video

below for the principles of a great blowdry, my secret weapon tools for the job, and a few techniques that will improve your skills in a snap! 

Tips for the perfect at-home blowout:

1- Less is more 

when it comes to styling products- keep it simple and your blowout will last longer! Apply a conditioning agent to the ends, and a volumizing agent to the roots... that's it! (remember you can always add more products later if needed.) Got frizzy or course thick hair? Then substitute the volume spray for a

smoothing balm

2- Hair has memory

, so work quickly to avoid hair reverting back to its wet-state-characteristics such as curl, frizz, or flatness. Allowing hair to air dry too long will start to lock in those unwanted characteristics, so begin drying within 20 minutes of showering and use your brush to both combat and refine. This way you'll create memory for the positive characteristics! 

3- The cooling is just as important is the heating. 

The time after the blow dryer turns off is also crucial to creating the perfect blowout! Continue to lock in the style for at least 20 minutes after the styling, by avoiding these like tucking hair behind your ears which cause dents to be created. For added volume allow the top sections to cool on large velcro rollers or using clips to hold curls in place while they cool

Thanks for watching and reading as always, and please be sure you are following along with me on

instagram

for some added behind the scenes looks into my life and my latest Snoop Stories. xo

Follow on Bloglovin

!function(d,s,id){var e, p = /^http:/.test(d.location) ? 'http' : 'https';if(!d.getElementById(id)) {e = d.createElement(s);e.id = id;e.src = p + '://' + 'widgets.rewardstyle.com' + '/js/shopthepost.js';d.body.appendChild(e);}if(typeof window.__stp === 'object') if(d.readyState === 'complete') {window.__stp.init();}}(document, 'script', 'shopthepost-script');

JavaScript is currently disabled in this browser. Reactivate it to view this content.

BRONZER 101 // SUMMER GLOW TIPS

Bronzer really can be a girls best friend if it's

applied correctly and with the right tone

. But it can be easy to also take bronzer in the wrong direction real quick, so today I putting you through my

Bronzer 101 course

.

The image above is a

guideline for the three ways to apply bronzer.

They are all designed to enhance your coloring and highlight different features of your face. Decide what your overall goal is for your finished look, then bronze accordingly.

Sun-Kissed

  • This technique is designed to mimic the natural color you get when you're out in the sun. It touches color to the high points of your face, and is cast from a downward position like that of the sun on your face.

  • Use this method when you are feeling pale and want to warm the complexion all over. Choose a tone that is warm and about 3 shades darker then your skin color. And for this option it is safe to use a formula with a slight shimmer in it as well. My fave is this Physicans Formula.

Rosy Glow

  • Choose this option when you are satisfied with your current skin tone, but want to enhance your cheeks with a pop of color to add more dimension to the face.

  • Use a rosy colored bronzer for this technique and focus the color on the apples of the cheeks. Apply a light sweep of the tone on the round part of your forehead near the hairline as well, and along the chin lightly. This will tie the tones together and highlight the bone structure of your face. Try Urban Decay Beached Bronzer

Contoured

  • For a chiseled or sculpted face, opt for the conturing technique which will accentuate your cheekbones and make the face appear more narrow and angular.

  • Use a matte grey-based bronzer for this technique, so that the color created mimics that of a shadow on the face. Apply the color under the cheekbones, down the sides of the nose, and at the hairline. You can also apply a light amount under the jawline and down the neck for a cohesive color palette. A great option is the Milk Makeup Matte Bronzer

Hope this guide will amp up your face-game, thanks so much for reading- and please share this with your friends on pinterest or facebook. xo

Follow on Bloglovin

THE NEW BREED OF BRUSH THAT WILL GIVE YOU A PERFECT BLOWOUT

square round brush, Fromm Square Rounder Brush

The perfect BLOWOUT

is something that pretty much every woman wants. Nothing feels better than bouncy polished locks, and I know that my clients are always on the hunt for the right tools for the job. In fact I get asked about my brushes at the salon more than any other question- because the brush (and the blowdryer) make all the difference in your finished look.

The Beauty Snoop

A few weeks back I published this pic on instagram, and had lots of followup questions about these square brushes. So I thought I'd give you the scoop snoop!

The Fromm 1907 Square Brushes have been my go-to brushes in the salon for the last 2 months since I got my hands on them. The unique design changes the game when it comes to your blowout and here's why:

The Corners: The soft corners on the brush give it more grip and tension on the hair so you are able to keep the hair in the brush without it slipping out. The corners also give more tension so you are able to 'pull' the curl and frizz out of the hair more easily. They also help to give more lift and volume at the crown. But don't let the idea of corners scare you into thinking that you'll have creases anywhere in your hair, or that you can't achieve curl with this brush. In face, the opposite is true; you'll get better curl from it because of the above mentioned features.

The Flat Face: Another cool feature of the Fromm is that it can be used like a flat or paddle brush to create a smooth finish. You can choose not to rotate the brush at all, and simply use the flat surface of any side to get a straight look.

The Rippled Bristles: The nylon bristles on this brush have a slight waved or rippled texture to them which aids again in the tension and grip of the hair. They also help to keep the hair down against the barrel of the brush where it's heated through and polished. Straight bristles let the hair slip off more easily, so this is a unique touch that I really love!

It's time to switch up your brush, you'll thank me later! xo

Follow on Bloglovin

APPLY BLUSH LIKE A PRO WITH THESE QUICK TIPS

Apply blush tutorial

I firmly believe in the power of blush, and that it is a vital part of any makeup routine.

The proper application of blush is like an instant face lift and brings a warmth and brightness to the face that no other type of product can. But if your not sure how to apply blush correctly, it can go south real quick. Here are the things you need to know to apply blush in the most flattering way for your face shape.

The Classic Application- all face shapes

  • Gives and a natural flush of color, works with all blush colors (including brights!)

  • Apply an oval brush stroke over the cheekbone, stopping under the center of the eye

  • Use a loose domed brush for easy blending like the Real Techniques Domed Brush

The Rosy Glow- long, oval or oblong face shapes

  • Visually cuts the face in half, to shorten and widen. Best with light peaches and pinks

  • Apply with a dabbing techniques on the apples of your cheeks

  • Use a stippling brush for tapping and blending like the Real Techniques Instapop Cheek Brush

Highlight Application- oval or heart face shapes

  • Emphasizes the eyes and give an upward lift to the face. Works with lighter shimmer tones

  • Sweep tone on the top of the cheekbones, up towards the temples

  • Use a fan brush to easily work around the eye like the It Cosmetics Fan Brush

Sculpt Technique- round or square face shapes

  • Chisel out cheekbones and create a more angular face. Use brown/ beige based blushes

  • Sweep blush under the cheekbone from the ear forward, stopping below the center of the eye

  • Use an angled brush to help define the cheekbone and make the face appear more narrow, like the Sonia Kashuk Angled Brush

Thanks so much for reading, and let me know in the comments down below if you have any blush secrets to share. And links to the blush in the video are down below. xo

Follow on Bloglovin

ZIT COVERUP 101 // THE BEST WAY TO COVER ACNE

zit coverup, acne camouflage, acne coverup, covering acne scars

Zits are simply the worst.

I have shed a few too many tears over the state of my skin, and truth be told, it was less than a week ago that I had my most recent cry for that very reason. Anyone who has struggled with acne knows the pain and heartache that can come when you skin doesn't cooperate. It may seem trivial (and in the GRAND scheme of things, I know it is trivial) but living each day with ugly bright red bumps on your face is not something I wish anyone to endure.

My skin has improved quite a bit over the last year, but lately I've had a flare up that has been plaguing my self esteem and made me want to throw in the towel. But alas, life must go on, and with that I thought I would give you a quick video to show the process I go through to cover acne each day.

I'm calling it Zit CoverUp 101- and I hope you find it helpful! Watch the video below and then check out the products that I use and recommend too.

Products Used in Video:

I truly hope this video is helpful to you, if only to let you know that you are not alone when dealing with acne. If you know someone who might benefit from this post too, please share! xo

Follow on Bloglovin

!function(d,s,id){var e, p = /^http:/.test(d.location) ? 'http' : 'https';if(!d.getElementById(id)) {e = d.createElement(s);e.id = id;e.src = p + '://' + 'widgets.rewardstyle.com' + '/js/shopthepost.js';d.body.appendChild(e);}if(typeof window.__stp === 'object') if(d.readyState === 'complete') {window.__stp.init();}}(document, 'script', 'shopthepost-script');

JavaScript is currently disabled in this browser. Reactivate it to view this content.

WHAT TYPE OF HIGHLIGHTS ARE RIGHT FOR YOU? // DECODING STYLISTS LINGO ONCE AND FOR ALL

explanation of the differences between balayage, ombre, foiling, highlights, tipping

It can be confusing to sit down in your stylists' chair, and discuss the myriad of possibilities when it comes to highlights. Plus there are new techniques popping up all of the time, not to mention buzzwords and trends that come and go so fast, it'll make your head spin! 

That being said- this post will clarify the techniques you can expect to hear about in your local salon, and the different results you'll achieve with them.

Studio5 TV

stopped in to my salon today, so I can give you the run down and hopefully lessen your confusion and help you to get the best results for your own individual needs.

Moore Hair Design

 |  Salt Lake City

Why are some highlights processed in foils/papers, while others are left exposed?

  • Foil or paper sheets are used to separate hair strands from one another to prevent colors bleeding on to one another. It's a physical barrier and also a surface for the stylist to apply color onto for control and precision.

  • Color that is processed inside a foil also processes to be brighter/lighter because of the heat that is created inside the packet of foil- resulting in higher contrasting highlights.

What are the different in-foil highlighting methods called? 

  • Fine Weave - Small (less than 1/2 inch) woven sections of hair are placed inside the foil and color is applied for a subtle and more blended highlight or lowlight.

  • Chunky/Wide Weave - Large (1/2-1 inch) woven sections are placed into the foil and color is applied for a bold pop of color that is high contrast to the surrounding colors.

  • Panels or Slices -Large sections of hair are placed without any weaving action prior to placement inside the foil. This results in the entire panel of hair receiving color, for a very bold color application. This technique is often used for fashion colors such as blues and purples.

  • Tipping - A technique typically reserved for shorter hair when the ends or tips of the hair are placed in a foil and color is applied in one of the above mentioned fashions. Leaving un-changed roots, but a visible color change in the tips of the hair.

What about hand-painted highlights?

  • Balayage - [balāˈyäZH] A free form painting method where lightener is applied at the stylists discretion, slightly off of the scalp and typically more subtly at the root area, and more heavily at the mid length and ends. This results in a melted or graduated effect with more depth in color at the roots and lightness at the ends. Variations of this method are result in these often-buzzed about color patterns: Sombre, Flamboyage, Ombre, Color Melt. This method is typically processed in the open air resulting in a more subtle contrast between the surrounding hair. You may see stylists use cotton strands or plastic wrap to help separate the sections during the process as well.

I hope that gives you a good over view and understanding of what your stylist is talking about next time you are at the salon. Got a question? Just ask in the comments below. xo!

Follow on Bloglovin

5 [EMBARRASSING] MAKEUP MISTAKES YOU DON'T KNOW YOU ARE MAKING

makeup mistakes, makeup blunders, avoid these makeup mistakes

Every time I switch up my hair color (which is a lot, in my case) I like to reevaluate the makeup that I pair with

said

new hair color. It is a great excuse to clean out my collection and update expired products etc. If you don't change you hair color as often as I do- then the beginning of each new season is a great time to do this as well.

During my last makeup update- I realized that I had made some pretty

bad makeup mistakes

in the past... which made me laugh, but also made me think that there are probably lots of women who make these mistakes too. Today's post will hopefully help you avoid those mistakes and leave you feeling beautifully confident!

5 [EMBARRASSING] MAKEUP MISTAKES YOU DON'T 

KNOW YOU ARE MAKING

1- YOU DON'T CHECK YOUR REFLECTION IN NATURAL OUTDOOR LIGHT PRIOR TO LEAVING THE HOUSE

  • This exercise alone will make the world of difference for so many women. Indoor lighting speaks LIES to all of us! Taking the time to look in the mirror while standing in front of a window will reveal uneven or blotchy makeup, the wrong color of foundation, too much blush or bronzer... and the list goes on. Don't skip this important step- And all of the below mistakes can be caught, by following this step alone.

2- YOU DON'T REMOVE EXCESS MAKEUP FROM YOUR HAIRLINE AND BROWS

  • A huge pet peeve of mine, and a mistake that I made for years before I realized! The fine hairs located in the hair line and just above the eyebrows or just in front of your ears (often referred to as peach fuzz or baby hair) are like magnets for foundation and powder. In the right lighting those hairs are now 'skin-colored', which is a dead giveaway that you are sporting [too much] makeup. Simply take a dry tissue and sweep it along the baby hair after you've finish your makeup and remove any excess that is sitting on the hairs.

3- YOU DON'T REMOVE EXCESS MAKEUP FROM YOUR INNER EYE AND LOWER LASH LINE

  • Along the same lines as above, using a cotton swab to remove excess makeup from your tear duct the inner rim of your eyes in a crucial step to making your look appear natural. The skin around your eyes is meant to be colored differently than the rest of your face, and when it is all the same tone, you are on a bullet train to 'over-done' land. Blend and transition... it's the name of the game! Make it easy with the one and only Beauty Blender.

4- YOU DON'T BLEND YOUR MAKEUP AROUND THE SIDES OF YOUR NECK

  • Holy crap- this again is another mistake that I used to make, and I see a lot while out in public. One time I saw a pic of me from the side, and I had a very clear 'line' that showed where I stopped blending my makeup on my neck. My chest and front of my neck looked great, but I forgot to blend and transition my bronzer around the sides of my neck. whoops! This is especially important when you are wearing your hair up and your neck is exposed.

5- YOU DON'T SET WITH TRANSLUCENT POWDER TO AVOID MAKEUP TRANSFER TO YOUR COLLARS OR NECKLINES

  • There is nothing less sexy than having makeup all over your collar. It happens to the best of us, but can be avoided if you either skip neck and chest makeup on collar-wearing days, or at the very least; set your makeup with a translucent powder to add a buffer and protect you clothing. I love this splurge or this save option. And this super save option too! Also placing a hand towel over your face, then sliding your top on over that, is a great way to avoid transfer.

I hope these tips help you to look and feel more gorgeous! Any other mistakes that you would add to this list? Let me know in the comments below- and come say hi over on

instagram

.

Follow on Bloglovin

!function(d,s,id){var e, p = /^http:/.test(d.location) ? 'http' : 'https';if(!d.getElementById(id)) {e = d.createElement(s);e.id = id;e.src = p + '://' + 'widgets.rewardstyle.com' + '/js/shopthepost.js';d.body.appendChild(e);}if(typeof window.__stp === 'object') if(d.readyState === 'complete') {window.__stp.init();}}(document, 'script', 'shopthepost-script');

JavaScript is currently disabled in this browser. Reactivate it to view this content.

THE TOP BEAUTY ARTICLES OF 2014 // WHAT YOU MAY HAVE MISSED

It's hard to believe and a little sad that 2014 is drawing to an end- and yet at the same time I am always so happy for a fresh start on a new year. I was reflecting this last week while I took a short break from the blog, over the amazing year that I have had as a blogger, and what great things happened on these pages, and in real life because of my journey with beauty.

Today I wanted to compile a few of the

Top Beauty Articles 

from this blog in 2014, and share them with you once again. You may have missed a couple, or want to re-read one or two. These are the cream of the crop [if I do say so myself] as well as the posts that had the most views or comments from readers this year. I hope you'll learn something new, and

share

an article with a girlfriend who might learn something too. (shameless plug ;)

Image above is clickable, or links available below:

Follow on Bloglovin

MY JOURNEY WITH ACNE // AN UPDATE AND RECOMMENDED PRODUCTS FOR HORMONAL ACNE

If you've followed my blog for a while, you may have heard me mention

my ongoing battle with acne

in the past. It still part of every day of my life- and I honestly hate sharing it with you because it is a sore spot of embarrassment and raw feelings. Being a 30 year old mother, with the zits of a 14 year old pubescent-boy, is frustrating to say the least!

I wanted to give you a quick update as to my progress (which is significant, yay!) and

hopefully encourage any readers out there that struggle with hormonal adult acne as well

. Here's a little

video

for you, and some of my current product recommendations.

Products Mentioned:

Past Posts Mentioned:

Thanks so much for reading and good luck with the rest of your Christmas planning this week! xo

Follow on Bloglovin

!function(d,s,id){var e, p = /^http:/.test(d.location) ? 'http' : 'https';if(!d.getElementById(id)) {e = d.createElement(s);e.id = id;e.src = p + '://' + 'widgets.rewardstyle.com' + '/js/shopthepost.js';d.body.appendChild(e);}if(typeof window.__stp === 'object') if(d.readyState === 'complete') {window.__stp.init();}}(document, 'script', 'shopthepost-script');

JavaScript is currently disabled in this browser. Reactivate it to view this content.

WHAT YOU NEED TO KNOW ABOUT FACE MASKS AND WHICH ONE IS RIGHT FOR YOU // MASK CLASS 101

top skin care masques, facial masks, Freeman Masks, Boscia Masks, Sheet Masks, Fiber Masks, Peel Off Masques, Rose Petal Mask

There are about a million and one different kinds of facial masks out there in the world of beauty, and it can be overwhelming to find the one that is right for you. I compiled this little

guide to give you a rundown of the basic types of skincare masques, so that you know what is best for your type of skin. I also stopped by Studio5 TV today to have a little fun with the holiday- after all, there's no better day than Halloween to talk about masks, am I right!?!

Why use a face mask at all?

Well masks are typically power-packed with super concentrated ingredients that deliver more to your skin than daily use products. They are designed to treat, balance, and correct skin issues more thoroughly, and they are also fun to use for a relaxation session about once per week.

Clay Masks-Freeman Chocolate & Strawberry Clay Mask or Mint & Lemon Clay Mask

Clay masques are designed to remove impurities from the skin, dry up oil, and leave the skin tightened and resurfaced. They are best for oily skin or those with large pores, and can also be spot treated in trouble areas such as the nose, forehead or chin.

Sheet Mask/Fiber MasksRenew You Fruit Enzyme Sleep Bamboo Mask

 The latest craze in skincare, has to be the introduction of the sheet mask! They have been popular in Asia for many years, but have now made it big in the US as well. The fiber sheet (often made of bamboo) is soaked in potent ingredients that are designed to hydrate or resurface the skin. The masks' cut outs for the eyes, mouth and nose- often resemble that of a 'Jason' hockey mask, but if you can stand looking silly for 20 minutes you'll love the way these masks deliver. Good for all skin types.

Fresh Food MasksLush Lettuce Love Fresh Mask

 Fresh ingredient masks use the vitamins and minerals found in fruits and vegetables to nourish the skin without the use of preservatives or other chemical ingredients. Often these masks are made from things like blueberries, seaweed, honey, bananas, and oatmeal. They have a short shelf life, about two weeks, and are great for those looking for a natural remedy. Be sure you are cautious with any food allergies when using these.

Peel Off MasksBoscia Luminizing Black Mask

 Peeling masques are designed to exfoliate the skin and remove impurities by peeling them away with the mask to be discarded. These masks are fun to use, and offer the most visual change to the skin after use. A thin coating of the product on the skin dries for about 20 minutes, then is peeled away to reveal a fresh layer of skin. I don't recommend these for people who have lots of redness, broken capillaries, or loose mature skin.

Cream/ Serum MasksCharlotte Tilbury Multi- Miracle Balm Mask

 Cream or Serum masques are designed to rehydrate the skin, calm redness, and reduce the appearance of fine lines. They are power-packed with ingredients such as Hyaluronic Acid, that draws moisture from the air into the skin. These are best for normal to dry skin, and can be used often for treatment of dry patches.

Gel MasksPeter Thomas Roth Rose Stem Cell Bio Repair Mask

 Gels are usually designed for anti-aging, and help to reduce the appearance of fine lines and wrinkles. They are great for evening out skin tone, and for moisturizing- using ingredients such as rose water or cucumber extracts. Gels can often be refrigerated as well to give a cooling and inflammation-reducing effect to the skin. They are meant for all skin types, and are also good for use on the neck area and decollate.

Hope you have a better idea of which mask is right for you. Let me know if you have a favorite mask that I should try in the comments down below. See you all next week- and have a Happy and Safe Halloween! xo

Follow on Bloglovin

!function(d,s,id){var e, p = /^http:/.test(d.location) ? 'http' : 'https';if(!d.getElementById(id)) {e = d.createElement(s);e.id = id;e.src = p + '://' + 'widgets.rewardstyle.com' + '/js/shopthepost.js';d.body.appendChild(e);}if(typeof window.__stp === 'object') if(d.readyState === 'complete') {window.__stp.init();}}(document, 'script', 'shopthepost-script');

JavaScript is currently disabled in this browser. Reactivate it to view this content.

MASCARA WANDS 101 // WHAT YOU SHOULD KNOW BEFORE YOUR NEXT PURCHASE

Mascara Wand Shapes, Mascara Wands 101, What are the different shaped mascara wands for?

Find this helpful? Share it on

Pinterest

Ever wondered

what the crap all of those different mascara wands are for? Why are they shaped differently, and what will the results be?

It can be more than a little confusing at times- and really overwhelming when you are strolling down the makeup isle.

Wearing:

Can't Hold Me Down Dress

c/o White Plum

Well, rest easy my friends- today I am putting you through my

Mascara Wands 101

course, and by the end of it you'll be a pro! Here is what you need to know about the different mascara wand types, and don't miss the video from Studio5 TV with more info (available after 2pm MST) and the GIVEAWAY down below. Although there are variations out there that I haven't included, these are the 7 basic types of wands and the rest all fit under one of these categories as well.

Oversized Wand- Maximum VOLUME

These full bristle wands are designed for amplified volume all around. They will thicken the lashes as well as give length and are designed to POP the eye open with their effect. These types of wands are better for advanced makeup junkies who aren't 'flinchy' with eye makeup. If you have small or deep set eyes however, this guy is not the best pick. Try

Maybelline Mega Plush

 or

Too Faced Better than Sex

(dumb name, amazing mascara)

Cone Taper Wand- Winged Out Corners

Cone shapes will help direct the lashes toward the outer corners and accentuate the cat-eye look. The bristles that are longer will distribute more product on the lashes, so those will be the ones that are elongated. This mascara is great to pair with a cat-eye liner to really finish off the total look. Try

Maybelline Lots of Lashes

 or

Lorac Pro Mascara

Curved Wand- Fanned Out Curl

Curved wands are designed to fan out the lashes from the inner corner all the way to the outer corner. The wand shape mimics the curve of the eye, so the wand is the same distance from the eye all the way across. This gives more curl to the lashes located at the two corners of your eye. Try Cover Girl

Flamed Up Mega Curl

 or

Dior Over Curl

Balled Tip- Detailed Corners

The balled tip is a favorite of mine because it allows you get very near the root at the corners to thoroughly coat the base of the lashes, without the risk of poking yourself with a sharp point. You can also turn the wand vertically and sweep the ball end across the lower lashes with lots of precision. You can use the ball tip to direct the outer corners as well, so you have the exact shape you are looking for. Try

Rimmel Scandaleyes Show Off

or

ELF 3-in-1 Mascara

Micro Wand- Tinted & Natural

The micro wand is again a huge favorite of mine because I love the simplicity of it and the natural looking results it gives. Great for your 'no-makeup' days, a micro wand will deliver a dark pigment to your lashes but won't build volume or much length. I also love that a micro wand can get all the way down to the root of your lashes (without poking your eyeball) which is so helpful if you have naturally light eye lashes like blondes and redheads often do. Oh, and it's a dream on those lower lashes too! Try

IT Cosmetics Tight Line Primer

or

Maybelline Lash Discovery

Rubber Shorty- Defined Length

If length is your primary focus, a short bristled rubber wand is the right pick for you. The formula is most evenly applied with this type of brush so you'll have less clumps and be able to build up a longer length with more coats. The short bristles also work as a comb of sorts, keeping lashes extended straight, aiding in the length yet again. Try

Wet n Wild Mega Length

or

Covergirl Lash Blast Length

Flat Comb- Separated & Dark

Definition is the name of the game with lash combs, so if you love to see a separation between every lash then this wand is the one you need. The comb pushes through the lashes and forces each one into a designated path way in the comb. The result is a very uniform lineup of lashes that are equally spaced from one another and coated in lots of pigment. Try

Napoleon Perdis MesmerEyes

or

Mirenesse Cougar Mascara 

Thanks so much for stopping by today, I hope you found this guide to mascara wands helpful! If you want to win a HUGE goody bag of my fav mascaras for yourself, be sure you enter the giveaway down below using the rafflecopter entry. The first two entries are mandatory to play, and the rest are optional but additional entries into the running. Good luck! And check out my cute dress from

White Plum

today, it's only $39 and I LOVE it! 

Follow on Bloglovin

!function(d,s,id){var e, p = /^http:/.test(d.location) ? 'http' : 'https';if(!d.getElementById(id)) {e = d.createElement(s);e.id = id;e.src = p + '://' + 'widgets.rewardstyle.com' + '/js/shopthepost.js';d.body.appendChild(e);}if(typeof window.__stp === 'object') if(d.readyState === 'complete') {window.__stp.init();}}(document, 'script', 'shopthepost-script');

JavaScript is currently disabled in this browser. Reactivate it to view this content.

a Rafflecopter giveaway

MY SUMMER HAIR REVEAL AND RECIPE FOR SHINY LOCKS

Heyo! It's time for another look reveal- and this season I decided to warm things up and add a face framing POP of copper! You may remember a few weeks back when I

posted

about the celebrity trend I'm calling 'frame-lights'? Well I jumped on the bandwagon too (at home in my bathroom as usual).

PLUS, I answered a question that I get asked so often both here on the blogosphere and at the salon...

'how do I get SHINY hair?'

  Well peeps, the answer is... YOU FAKE IT! No but really, most of us aren't blessed with tresses that shimmer in the light, so I've deemed my process for shiny locks:

The Styling Book End

. Get the full scoop in the

video

 below.

Products Mentioned in Video

(secret recipe for shiny hair)

IT Haircare-

Fix IT

IT Haircare-

Polish IT

Wearing:

Blue Floral Dress

Thanks so much for stopping by today! Let me know if you've switched up your hair for Summer. And don't forget to come follow along on

instagram

for some fun extra glimpses into my world. xo

Follow on Bloglovin

Thanks to IT Haircare for sponsoring this post

5 QUICK TIPS FOR PREVENTING A MAKEUP MELTDOWN

combat makeup meltdown, makeup tips for humidity

I'll never forget the time I vacationed to Palm Springs one summer just after high school, in early June. It was my first time to that part of California, and I quickly learned that

'I wasn't in Kansas anymore'  

when I stepped out of the airport and was met with a wall of heat unlike anything I had ever experienced before!

As I literally felt the makeup melting off of my face I thought two things: 1) remind me to never visit Palm Springs during the summer months again, and 2) there has to be a better way to apply makeup when it's hot.

A decade later, I still haven't been back to Palm Springs later in the year than April- and I still change my routine in the warmer months to prevent makeup landslides.

Here are five quick tips that you can use to help your makeup hold up during the hottest months of the year. 

1- Exfoliate in the PM

I honestly learned this technique on a fluke. I am a pretty regular exfoliator, but sometimes I get lazy in the summer usually because I am staying up much later, then I fall into bed without going through my whole skincare routine. After a couple weeks of skipping the scrub step, I realized that my makeup was breaking down much more quickly than usual and I was looking greasy by 4pm.

The culprit? Clogged pores and dead skin cells. My skin wasn't able to breath- causing major oil buildup on my face. That led to a break down of the makeup with a reckless abandon. As soon as I added the scrub back into my nightly (2 times per week) routine, my makeup adhered to my skin better and resisted the elements of heat and humidity much better. Now, I never miss this step and I hope you won't either!

* If you are wondering why I specified NIGHT time scrubbing? Because scrubbing can cause redness, so give your skin a whole 8 hours to calm and repair before applying makeup. Try

Beautisol Exscrub Me?

2- Switch to a gel moisturizer

Cream moisturizers often leave a sheen on the skin that doesn't absorb into the skin for many hours. That glossy finish, although radiant, won't do you any favors when combating humidity, heat and sweat. A gel moisturizer will absorb into the skin much quicker and is light and refreshing with a matte finish. My current favorite is

Garnier Moisture Rescue for Dry Skin

3- Wait 10 minutes post moisturizer before applying anything else

After reading #2 above this step should be a no brainer, but here is the expanded version: apply your gel moisturizer to a clean face in the AM. Then give your face a solid 10 minutes to absorb the gel fully. This is a great time to work on your hair, check your

social

feeds (which hopefully include yours truly! #shamelessplug) or get dressed. Finally, continue with your makeup application.

4- Set first with spray

Once you've completed your beautiful face canvas, set your masterpiece with a makeup setting spray. I love

NYX Matte Finish

in the Summer months (I choose their Dewey finish in the winter) because it works great and is totally affordable. Think of this step as hairspray for your face. Neat-O

5- Set second with powder

And finally hit your T-zone with an extra dose of translucent powder for major oil control and staying power. You can also reapply midday for bonus power, if needed. My go to?

Urban Decay De-slick Mattifying Powder

Hope these tips help you stay fresh all day long. Got any meltdown tips of your own? Let me know in the comments below, xo And don't forget to enter my huge Summer Beauty Box giveaway

here

!

Follow on Bloglovin

!function(d,s,id){var e, p = /^http:/.test(d.location) ? 'http' : 'https';if(!d.getElementById(id)) {e = d.createElement(s);e.id = id;e.src = p + '://' + 'widgets.rewardstyle.com' + '/js/shopthepost.js';d.body.appendChild(e);}if(typeof window.__stp === 'object') if(d.readyState === 'complete') {window.__stp.init();}}(document, 'script', 'shopthepost-script');

JavaScript is currently disabled in this browser. Reactivate it to view this content.

ASK THE EXPERT: HOW DO YOU ACTUALLY USE DRY SHAMPOO? AND WHICH ARE THE BEST ONES?

I've mentioned my un-dying love for DRY SHAMPOO on this blog before (ok a couple times) but when this reader question came in from @BrianneE, I thought- 'hey, you've never shown them HOW to use it effectively! Duh!'

She asked... 'What are the best dry shampoos, and how do I actually use them? Are there tricks and tips that I am missing?' Well the simple answer is yes! Check out my latest video below and pick up a few of my techniques and favorite dry shampoos out there.

Products mentioned in video:

I sure hope that answered your question Brianne, and that you fall in love with dry shampoos like I have! And if YOU have a question you'd like me to answer in my All About Hair Series- send me an email or leave a comment below. Have a great 4th of July! xo

Follow on Bloglovin

!function(d,s,id){var e, p = /^http:/.test(d.location) ? 'http' : 'https';if(!d.getElementById(id)) {e = d.createElement(s);e.id = id;e.src = p + '://' + 'widgets.rewardstyle.com' + '/js/shopthepost.js';d.body.appendChild(e);}if(typeof window.__stp === 'object') if(d.readyState === 'complete') {window.__stp.init();}}(document, 'script', 'shopthepost-script');

JavaScript is currently disabled in this browser. Reactivate it to view this content.

ASK THE EXPERT: HOW DO I GET BIG VOLUME IN MY LIMP FINE HAIR?

Heyo! Today I am answering one of the most-asked questions ever for a hair stylist- 'how do I get more volume?' I'd estimate a whopping 70% of women out there wish they had more lift and life in their locks. And when I announced my next series of

Ask The Expert

was all about HAIR... many of you wanted help with limp styles. Zero surprise. But it's a topic I still love to address because I have fine hair myself and need help in the oomph department as well.

This question was sent in via

instagram

from reader @torrima, and she says: '

I feel like my hair just hangs there... what are some no-fail ways to get volume if I have fine hair? 

' To hear my secret recipe for BIG VOLUME hair, check out the

video

below. Hope it helps you too!

Products mentioned in video:

Kerastase K Lift Vertige

Pureology Lustrous Volumizer

 (for salon locations)

Plastic Grip Rollers

Sam Villa Textur Iron

- (20% Off coupon code for Beauty Snoop readers: 20FORUT)

Do you have a hair question you'd like an answer to? Let me know in the comments or shoot me an email. Remember the higher the hair...the closer to GOD! xo

Follow on Bloglovin